How to Add a Safe Zone Overlay in CapCut
CapCut is the most popular video editor for short-form creators, but its preview player shows an unobstructed 9:16 canvas. It gives you no indication of where TikTok's comment buttons, Instagram's audio tags, or YouTube Shorts' subscribe button will land.
Adding a temporary guide overlay directly on your CapCut timeline allows you to compose titles, stickers, and animated subtitles with pinpoint accuracy — ensuring nothing gets cut off once your video goes live.
Check your video first: Before adjusting text, drop a freeze-frame into ReelGuard's free safe zone checker. You can inspect your footage against live TikTok, Reels, and Shorts interfaces with zero uploads required.
Why CapCut's Preview Cannot Be Trusted
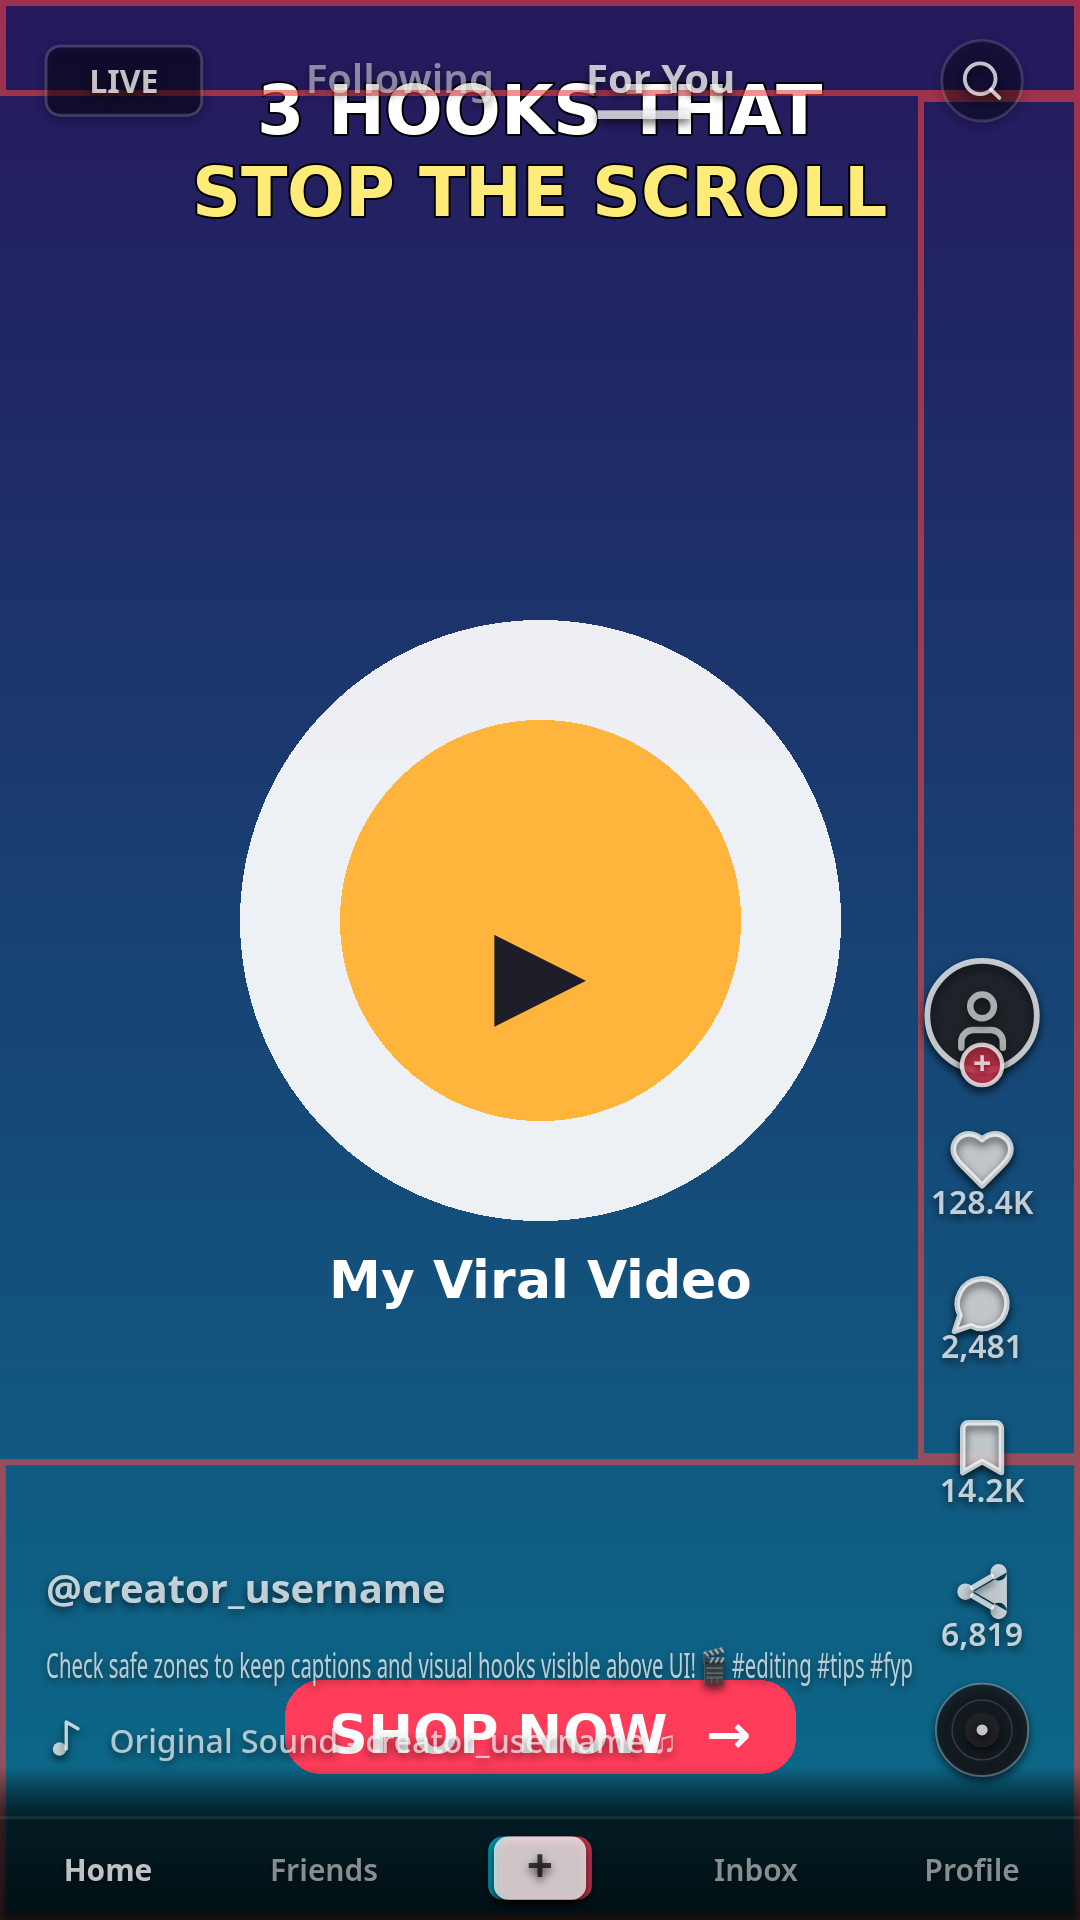
In CapCut, you have a completely clean 1080×1920 viewport. But the moment you publish to TikTok, up to 35% of your frame is obscured by platform interactive layers:
- Top 150 px: Following/For You tabs and search bar.
- Bottom 320–480 px: Account handle, sound title, multi-line caption, and shop links.
- Right 160 px: Avatar, Like, Comment, Bookmark, and Share button rail.
What You Need
To set up a safe zone workflow in CapCut, you just need:
- Your video project loaded in CapCut (mobile or desktop).
- A reference image or checked frame from ReelGuard showing the safe boundaries.
- Two minutes to align your text before final export.
Step 1: Check Your Frame Before You Touch CapCut
Export a quick screenshot of your CapCut project (or pause playback and screenshot your phone screen). Drop that image into ReelGuard. The tool immediately overlays the exact safe zone outline so you can identify which text elements need moving.
Step 2: Add the Overlay in CapCut (Mobile)
- Open your project in the CapCut mobile app.
- Tap Overlay in the bottom toolbar, then tap Add overlay.
- Select your safe zone guide image.
- Pinch to scale the overlay until it fills the 9:16 frame completely.
- Drag the overlay edges on the timeline so it stretches across your entire video length.
- Tap Opacity in the bottom menu and lower it to 40%–50% so you can see your video footage underneath.
Step 3: Move the Text Into the Safe Area
With the semi-transparent overlay active as your visual guide:
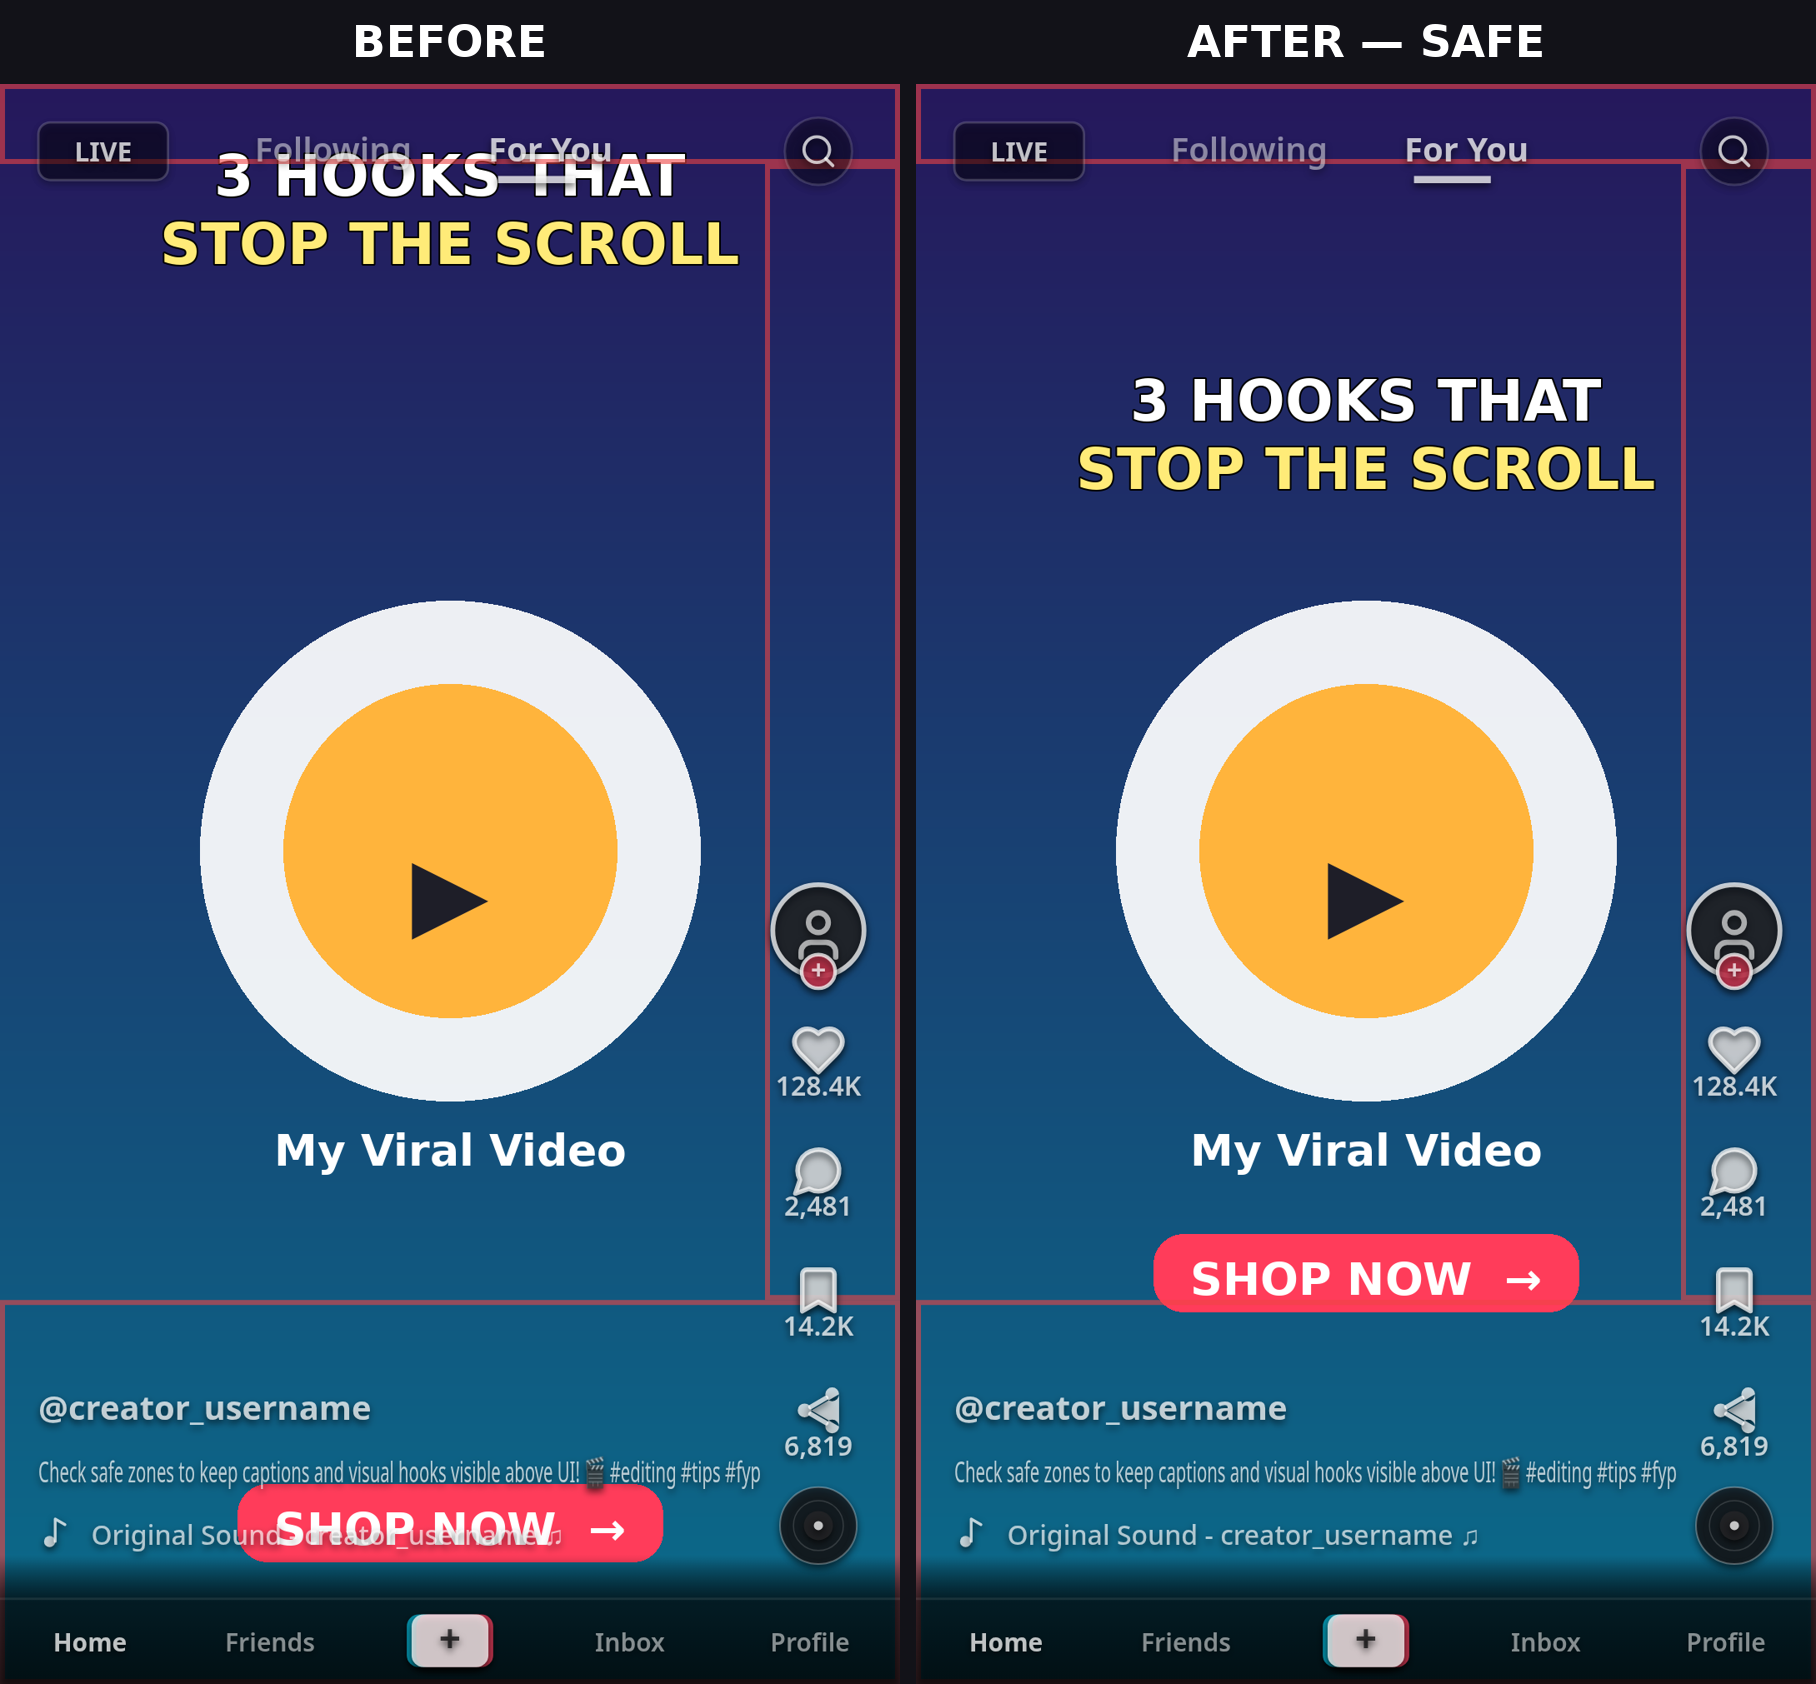
- Select your main title or hook and reposition it into the upper-middle safe band (below the top tabs).
- Select your auto-captions or subtitle layers and ensure they sit comfortably above the bottom caption zone.
- Move any logos, handles, or call-to-action buttons away from the right-hand icon column and bottom-right corner.
Step 4: Hide or Delete the Overlay Before You Export
Crucial step: You must not export the guide marks in your final video!
- Tap on the overlay layer on your timeline.
- Either tap Delete to remove it, or tap Opacity and set it to 0% (so you can turn it back on later if you need to make changes).
- Tap the Export (↑) button in the top-right corner to render your clean video.
On CapCut Desktop
On CapCut Desktop (Mac or Windows), the workflow is just as easy:
- Import your reference guide image into the Media bin.
- Drag it onto a track above your video footage.
- In the top-right Video panel, set Blend Mode to Normal and adjust Opacity to 50%.
- Reposition your text layers.
- Click the eye icon next to the overlay track to hide it before exporting.
CapCut Auto-Captions Need the Same Fix
When you use CapCut's popular Auto-Captions feature, the app places subtitle text directly in the lower-third by default. This is the exact zone covered by TikTok's caption bar and Instagram Reels' audio tags!
To fix this: Enable Apply to all in the text formatting menu, tap and drag the subtitle box upwards to roughly 45%–50% frame height (around Y 900). This shifts all subtitle cards into the safe zone in a single action.
Crossposting? Check All Three, Not Just One
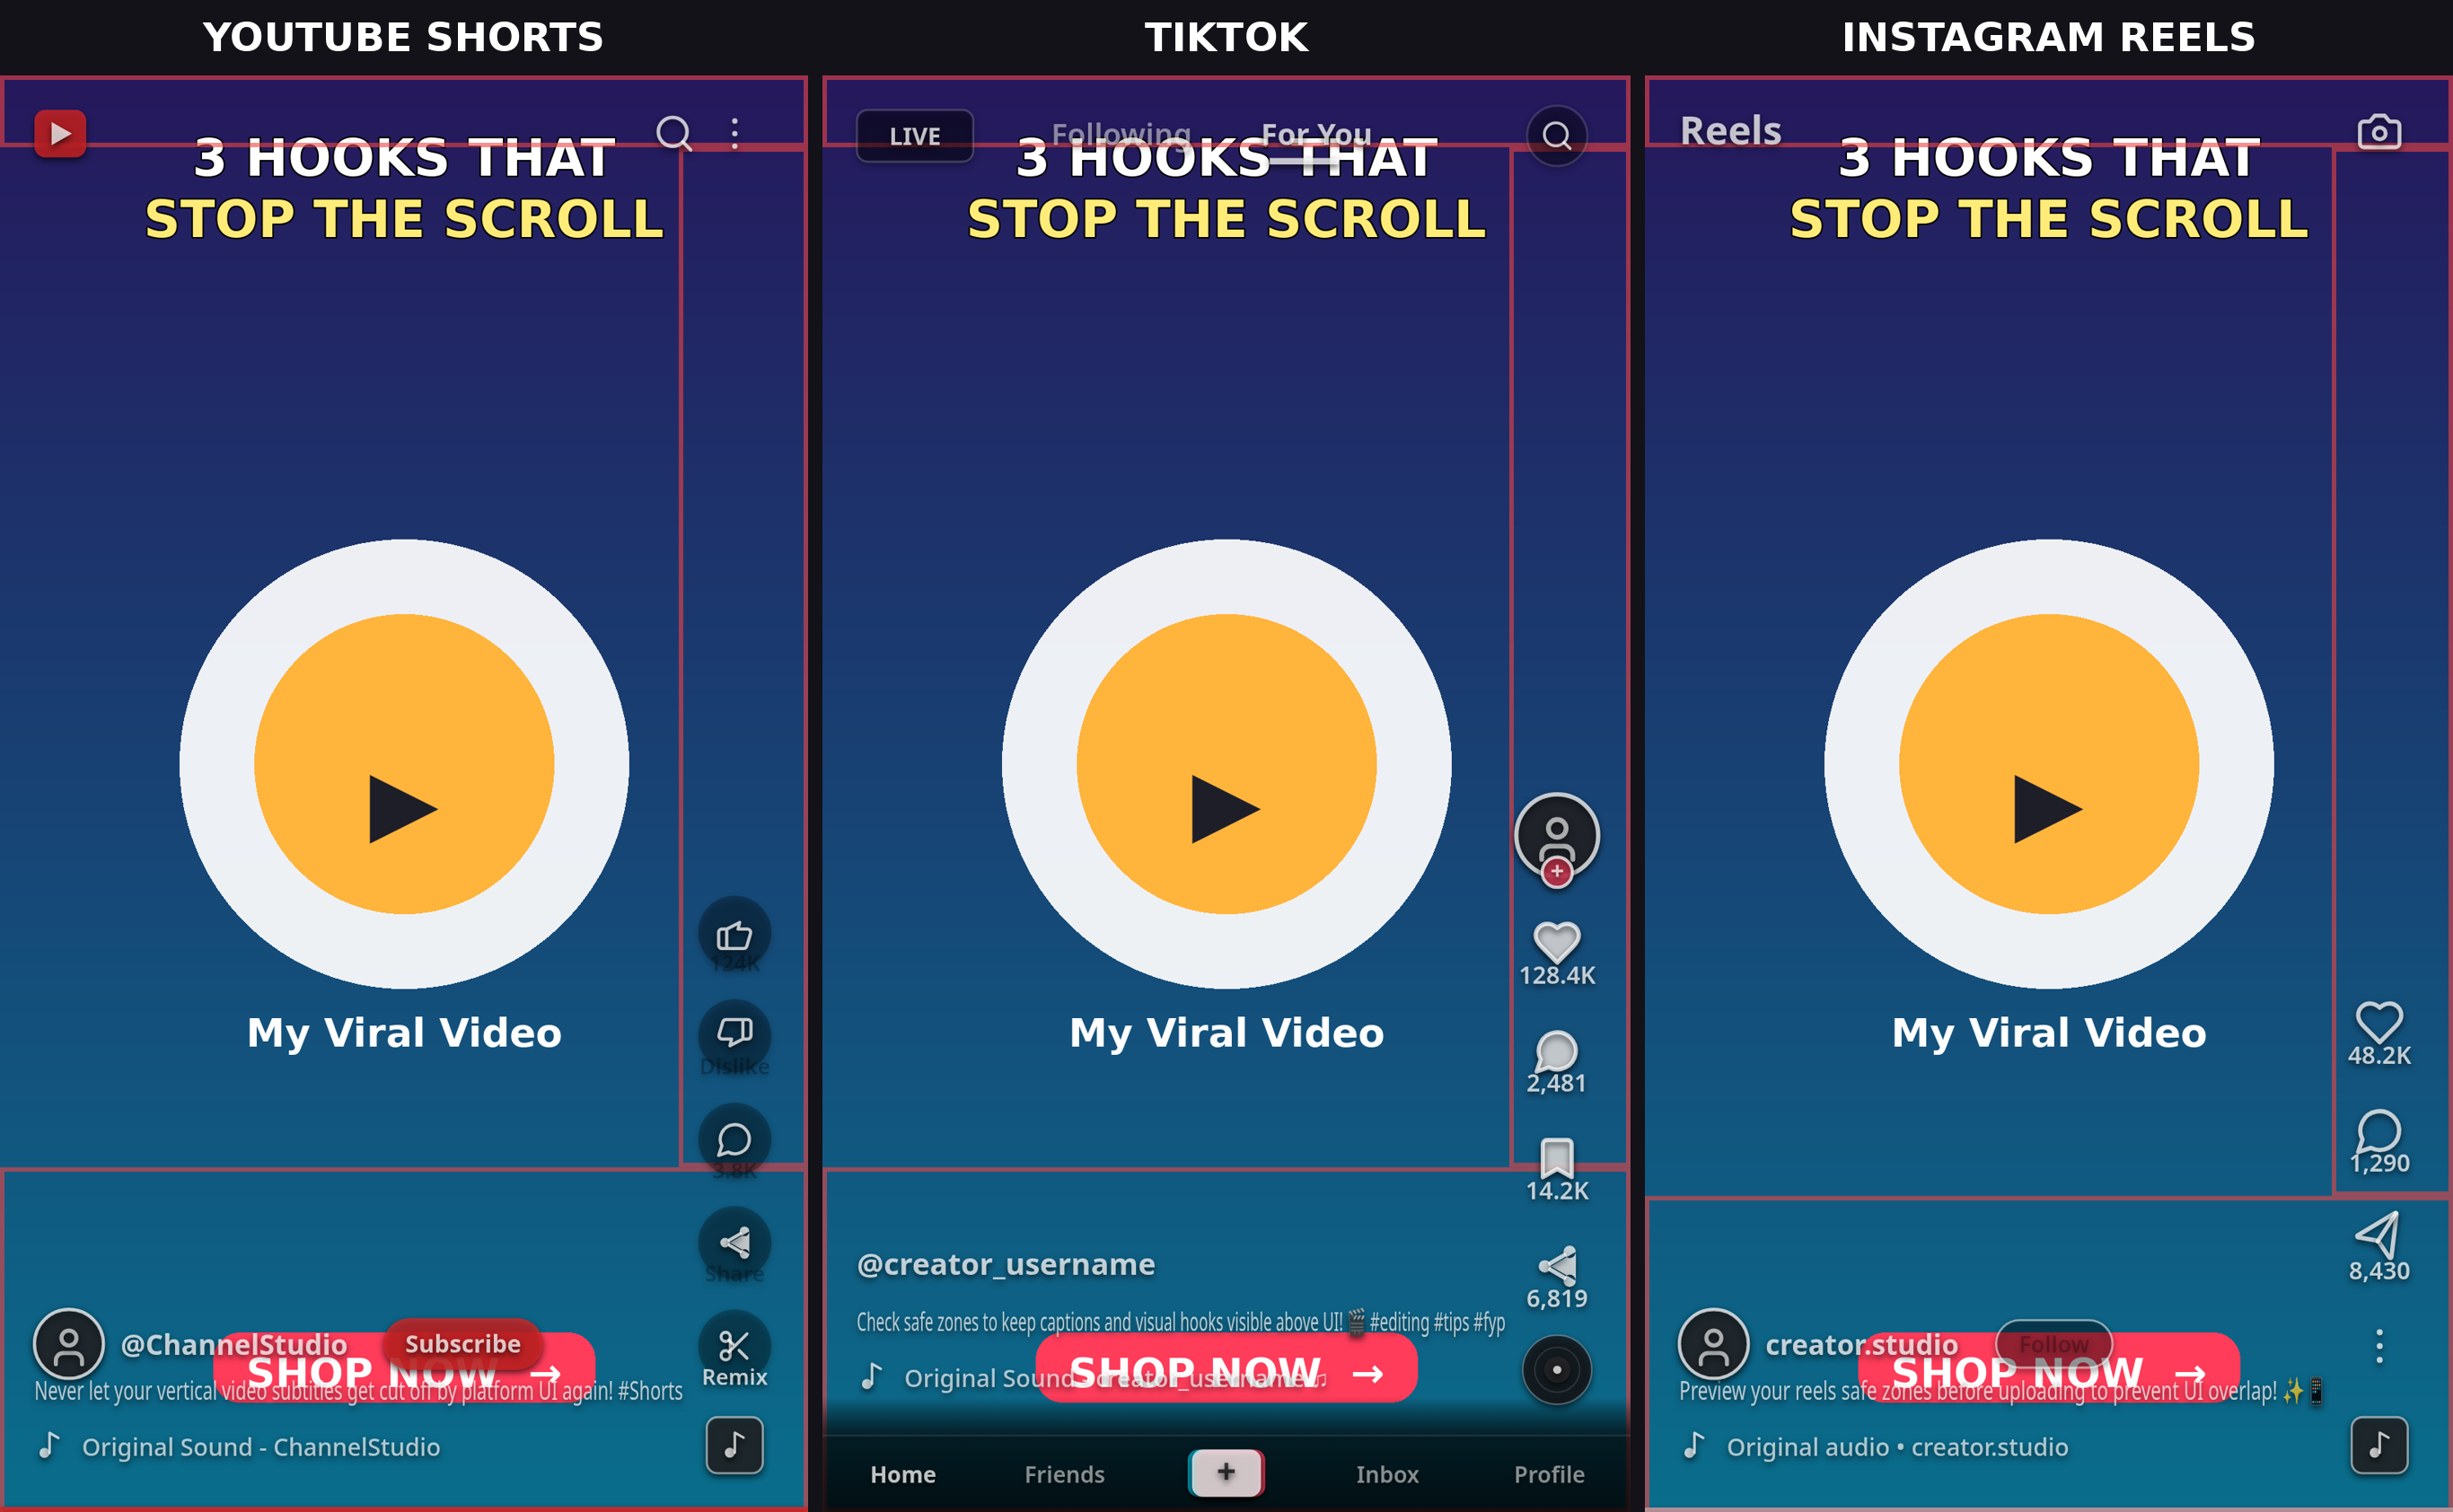
If you publish the same video to Instagram Reels or YouTube Shorts, remember that each platform has distinct obstructions:
- TikTok: Read our TikTok Safe Zone Dimensions 2026 guide.
- Instagram Reels: Crops to 4:5 in the home feed. Read our Instagram Reels Safe Zone Guide.
- YouTube Shorts: Large subscribe button in the bottom right. Read our YouTube Shorts Dimensions Guide.
- One Master Layout: Learn how to create one design safe for all three in our One Design Safe Crosspost Guide.
Common Mistakes
- Leaving the overlay visible on export: Always delete or hide the overlay layer before rendering your final MP4.
- Stretching the overlay disproportionately: Ensure the overlay fits the 9:16 canvas with 100% proportional scaling.
- Forgetting right-rail button clearance: Leaving captions too wide causes right-side text to clip under the like button.
- Not checking on mobile: Text size that looks easily readable on a desktop monitor may appear tiny on phone screens. Use at least 24 px font size.
Before-Export Checklist
Run through this 30-second checklist before exporting from CapCut:
✓ Opening title is below top 150 px.
✓ Auto-captions are lifted out of the bottom 400 px zone.
✓ Subtitle lines break before X 880 px to clear the right icon rail.
✓ No logos or essential graphics sit in the bottom-right corner.
✓ Overlay layer is hidden (0% opacity) or deleted.
FAQ
Does CapCut have a built-in safe zone overlay?
No. CapCut currently does not include built-in dynamic safe zone guides for TikTok, Reels, or YouTube Shorts. Using a temporary image overlay or testing your frames in ReelGuard is the most reliable way to prevent cutoffs.
How do I fix CapCut auto-captions being cut off on TikTok?
Select any caption box in CapCut, ensure "Apply to all" is turned on, and drag the text upwards toward the middle of the screen (around 45%–50% frame height). This moves all captions above TikTok's lower-third interface.
What resolution should my CapCut project be?
For vertical video on TikTok, Instagram Reels, and YouTube Shorts, always use 1080×1920 pixels (9:16 aspect ratio) at 30 or 60 fps.
Is ReelGuard free to use?
Yes, ReelGuard is 100% free with no sign-up or software installation required. Everything runs directly in your browser, keeping your videos completely private.