How to Add a Safe Zone Overlay in Premiere Pro
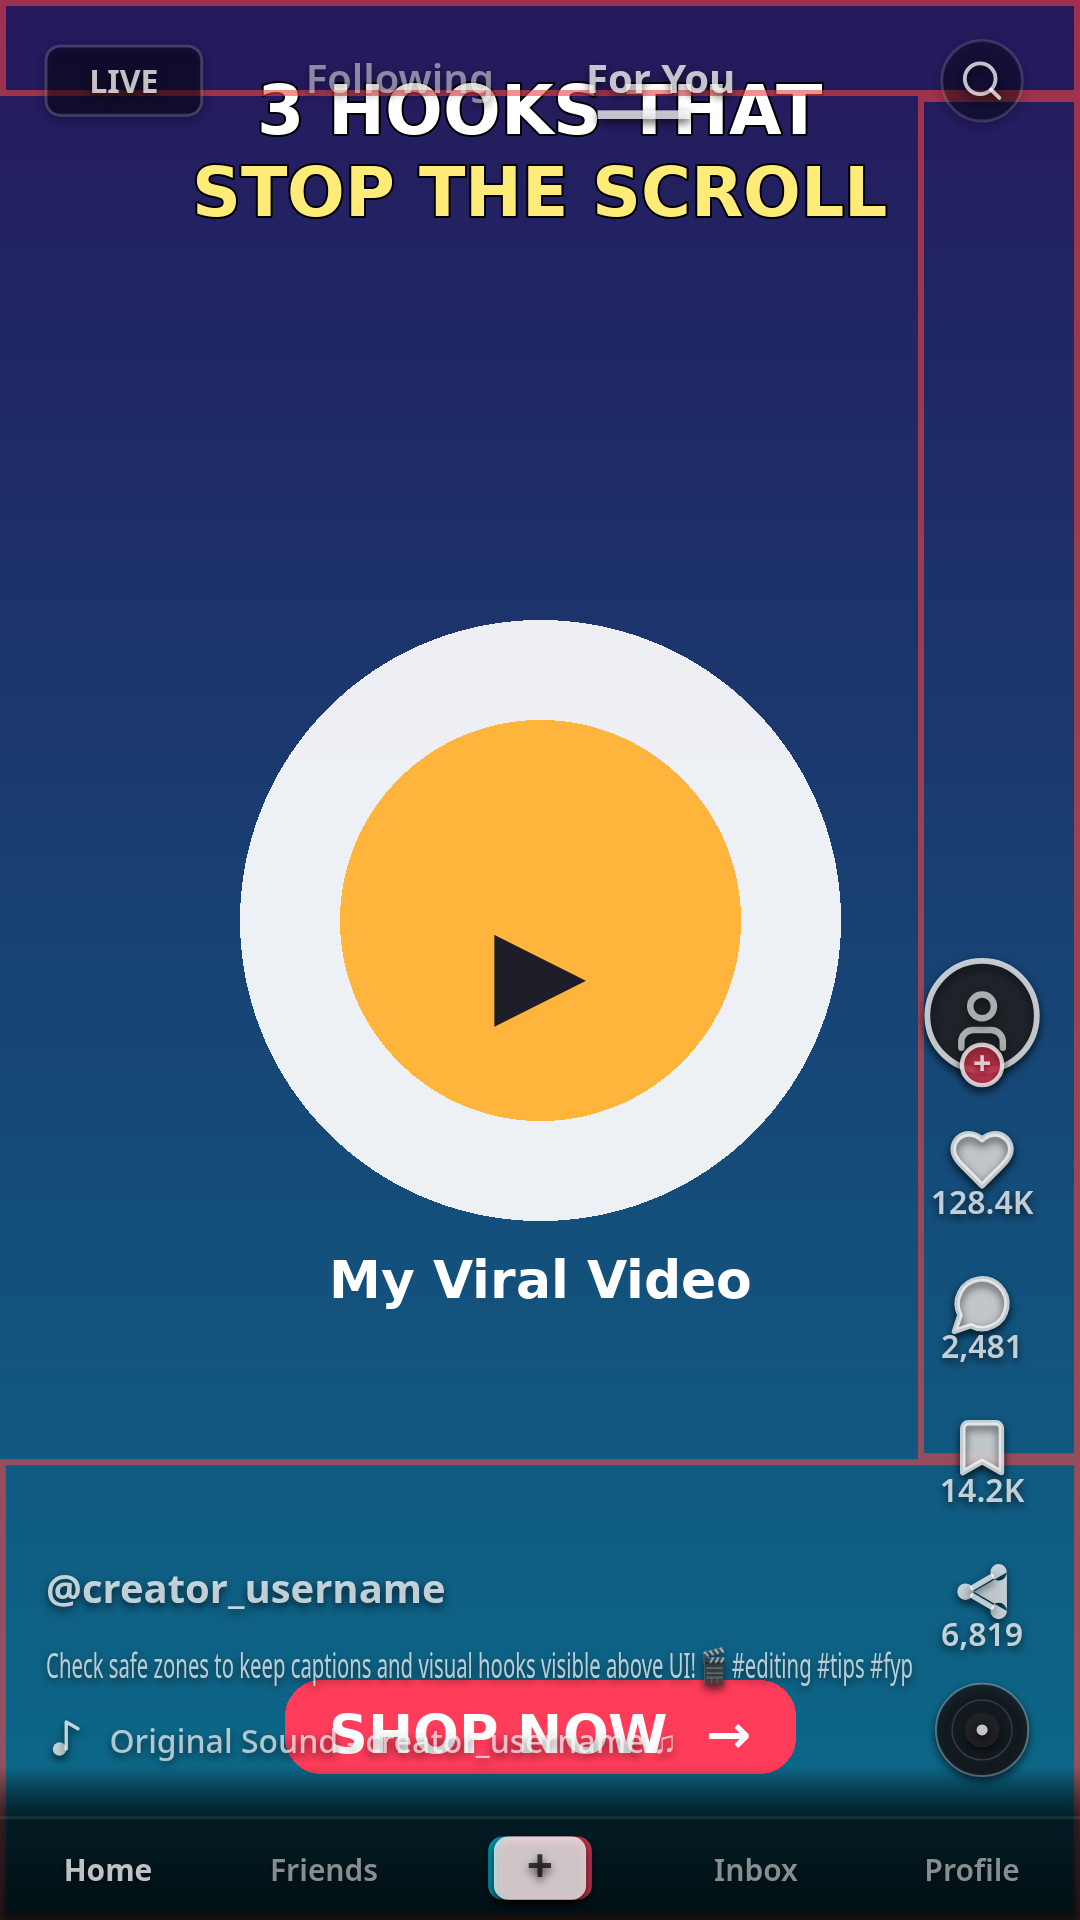
You cut a client vertical in Premiere Pro: headline centered, lower third on the brand grid, CTA locked to the bottom. You export, the client uploads to TikTok — and the headline is half-hidden under the tabs, the CTA buried under the caption, the lower third behind the like button.
Premiere Pro did not move your text. TikTok covered it. Premiere Pro shows a clean frame; TikTok, Reels, and Shorts always draw their own interface on top of your video: tabs at the top, a rail of buttons down the right side, and a username and caption block across the bottom.
A safe zone overlay fixes this before you export. It is a temporary reference image on the top video track of your timeline, showing exactly where those platform zones fall. Align your titles inside the clear area while it is visible, then hide or delete that track before export.
Quick check: if you want to see the zones on your own frame first, run a screenshot through ReelGuard's free safe zone checker — it overlays the real TikTok, Reels, or Shorts UI on your design in your browser. Nothing is uploaded; everything runs locally.
Why Premiere Pro's Program Monitor Cannot Be Trusted
The Program Monitor is a clean preview — and that is the problem. It has no built-in platform overlay, so text near the edges looks safe when it is not. The zones also move between platforms: a layout that clears TikTok's top tabs can still lose text under Reels' taller header, and Shorts has a subscribe button with no TikTok equivalent. And captions grow after export — a caption block expands upward as the client types.
What You Need
- A Premiere Pro project with a 1080×1920 (9:16) vertical sequence.
- A reference frame: a still from your sequence, or a Program Monitor screenshot with your titles visible.
- A ReelGuard checked preview of that frame, saved as a PNG — the overlay you will place on the top track. A transparent safe zone PNG works the same way.
Generate the preview for the platform you are delivering to.
Step 1: Check Your Frame Before You Touch the Timeline
- Export a still frame (Program Monitor → Export Frame), or screenshot the timeline with all titles and captions visible.
- Open ReelGuard, drop in that frame, and turn on the overlay for the platform you will deliver to.
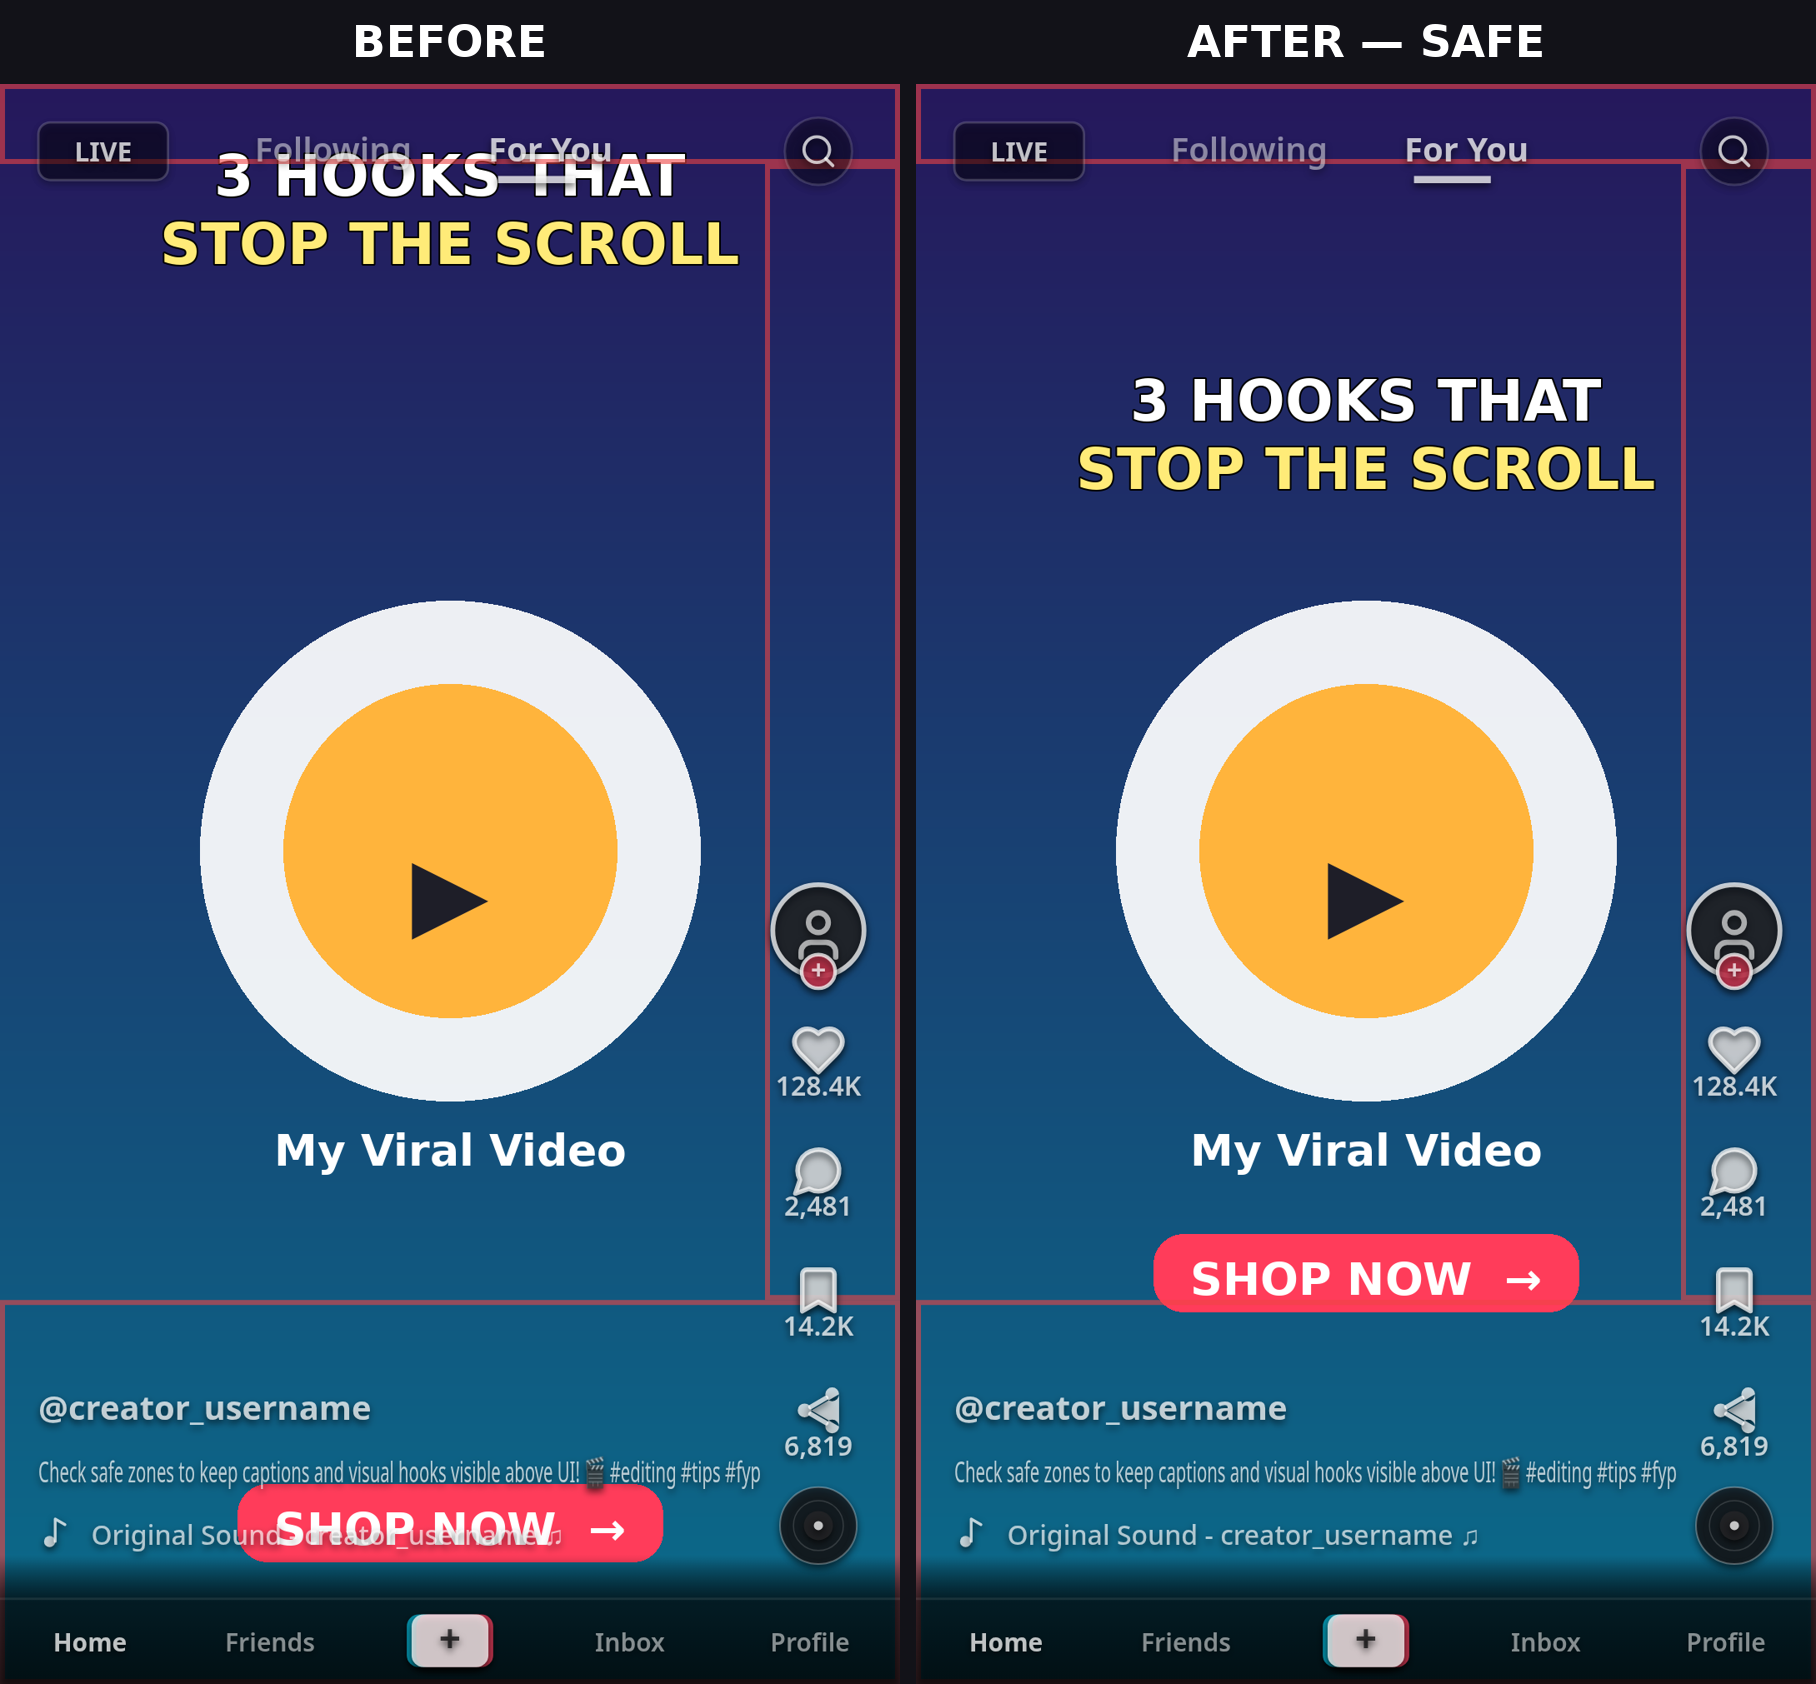
- Note what gets covered: headline under the top tabs? Lower thirds ending under the right rail? CTA under the caption block?
On a TikTok 1080×1920 frame: top ~140 px, right ~140–160 px strip, bottom ~300–350 px. Keep must-read text out of all three, and leave extra room at the bottom for a long caption.
Step 2: Add the Overlay as a Guide Layer in Premiere Pro
- Import the ReelGuard checked preview PNG (File → Import, or drag it into the Project panel).
- Drag it onto the top video track, above every other track, so it sits on top of everything while you edit.
- Stretch the overlay clip across the entire sequence. If it only covers the opening, later scenes go unchecked.
- In Effect Controls, scale the overlay to fill the entire 9:16 frame, edge to edge, with no distortion. If it is smaller than the frame, the zones sit in the wrong place.
- If the overlay is hard to see, lower its opacity to around 50% in Effect Controls while you work.
Step 3: Align Your Text Inside the Safe Area
With the overlay visible, fix each element in Essential Graphics:
- Headlines and hooks: pull them below the top tabs and, for Reels, below its taller header.
- Lower thirds and burned-in text: end every line before the right rail; shorten or split lines that run under the buttons.
- CTAs, promo codes, and prices: lift them above the caption zone — higher still for a long caption.
- Logos and watermarks: keep them out of the right rail and the bottom caption area.
- Check every scene, not just the first. Scrub through the whole sequence with the overlay on.
Essential Graphics Safe Margins: Use Them With the Overlay, Not Instead of It
The Essential Graphics panel has title-safe and action-safe margins, and they are worth turning on — but they are not a substitute for a platform overlay. Title-safe margins are a broadcast convention (roughly the inner 80% of the frame) that ignores TikTok's right rail, Reels' taller header, and Shorts' subscribe button. Use safe margins as a rough grid, and the platform overlay as the real check: if a title sits inside title-safe but still crosses the overlay's right rail, the overlay wins.
Step 4: Hide the Guide Layer Before You Export
This is the step people forget, and it ruins the export: a visible overlay track burns into your finished video. Before exporting, either click the eye icon to hide the overlay track, or delete the overlay clip from the timeline. Then play the sequence back once and confirm no overlay is visible anywhere.
Crossposting? Check All Three, Not Just One
A TikTok-safe layout is not automatically Reels-safe or Shorts-safe. The zones move: Reels has a taller top header and a larger bottom margin, Shorts has a wider right rail and a subscribe button. If the same cut goes everywhere, repeat Step 1 per platform, or design to the tightest shared area.
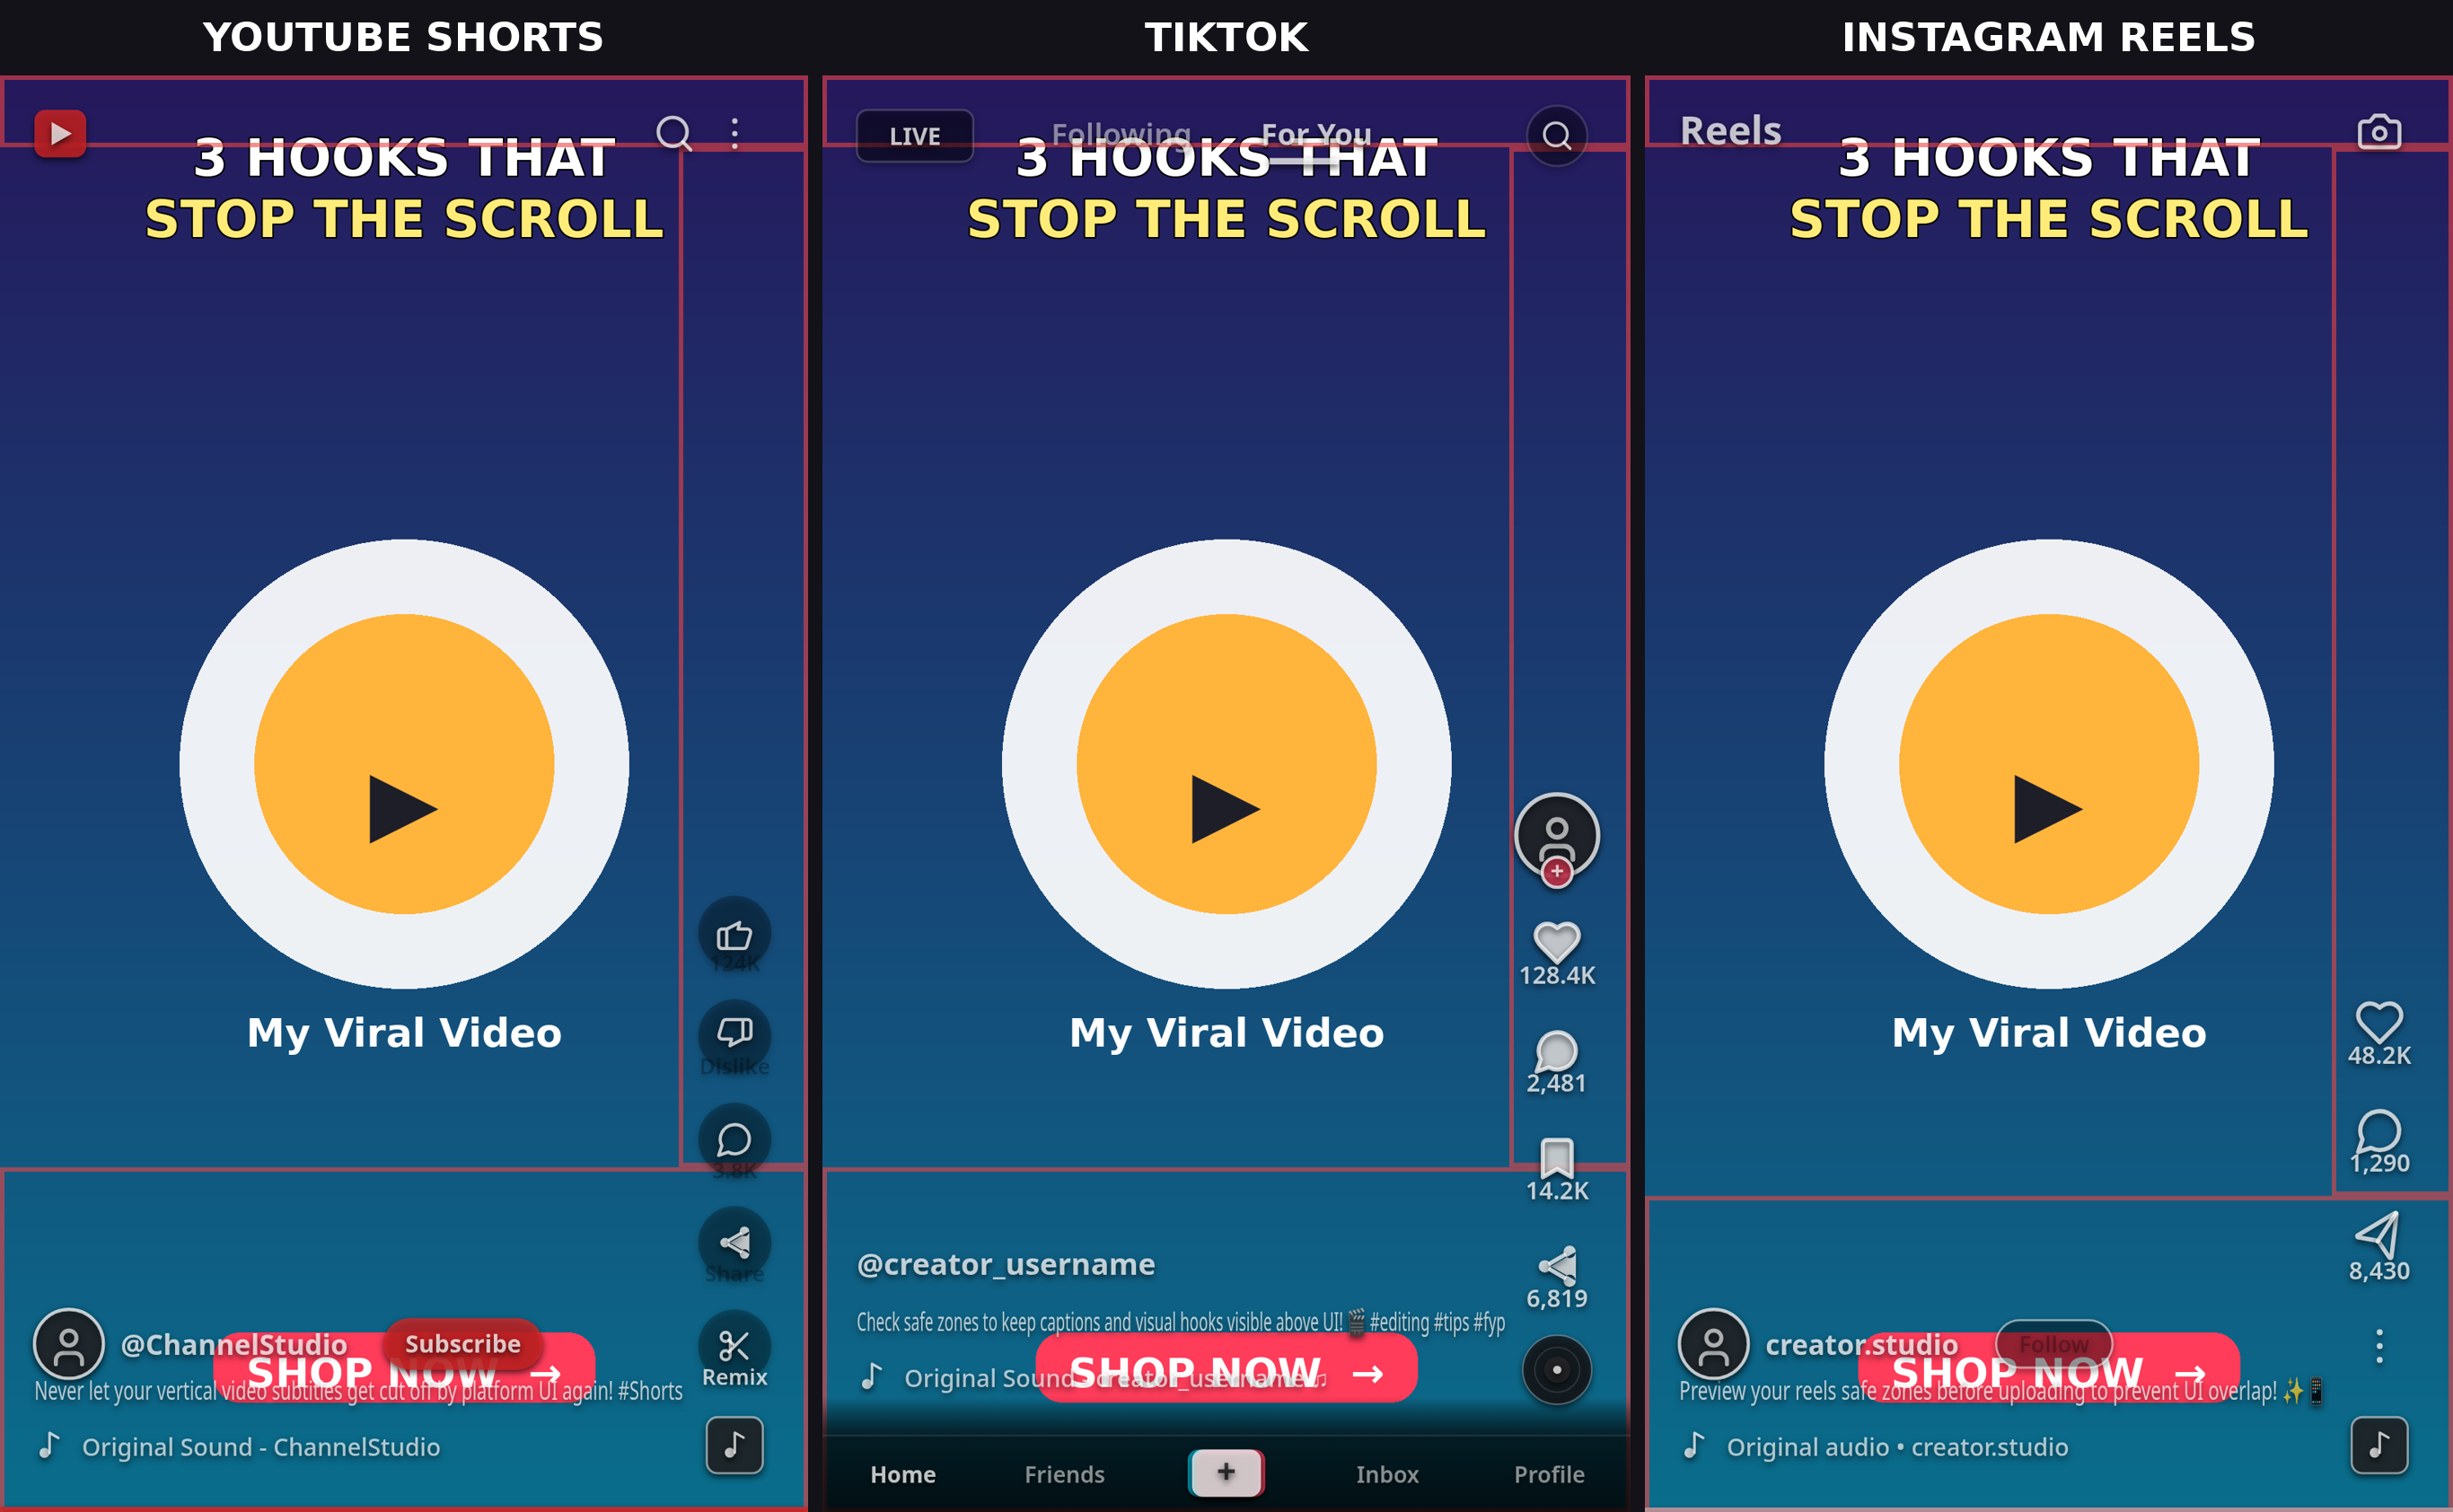
For the full numbers, see our TikTok Safe Zone Dimensions 2026 guide, Instagram Reels Safe Zone Dimensions 2026 guide, and YouTube Shorts Safe Zone Dimensions 2026 guide — and our CapCut safe zone overlay guide for the same workflow on mobile.
Common Mistakes
- Forgetting to hide the guide layer before export. Check the playback once, every time.
- Scaling the overlay to the wrong size. If it does not fill the 9:16 frame exactly, every zone is wrong.
- Trusting title-safe margins alone. They are a broadcast grid, not a platform overlay.
- Fixing only TikTok, then crossposting blind. Reels and Shorts have different zones — check them too.
- Shrinking text instead of moving it. Text under ~60 px tall on a 1080×1920 frame is hard to read on a phone even inside the safe area.
Before-Export Checklist
- Overlay fills the 9:16 frame and spans the full sequence.
- Headlines clear of the top tabs; every title line ends before the right rail.
- CTAs sit above the caption zone, with extra room for long captions.
- Overlay track hidden (eye icon off) or deleted.
- One full playback with no overlay visible — then export.
FAQ
How do I add a safe zone overlay in Premiere Pro?
Import a reference image — a ReelGuard checked preview works well — and place it on the top video track above all other tracks. Stretch it across the full sequence, scale it in Effect Controls to fill the 9:16 frame, and lower its opacity to around 50% while you edit. Align your titles inside the clear area, then hide the track or delete the clip before you export.
Where do I get a safe zone overlay image for Premiere Pro?
Check a frame of your own video in ReelGuard's free checker and save the checked preview — it shows the real platform zones and works as a temporary guide layer in Premiere Pro.
Why does my text look fine in Premiere Pro but get covered on TikTok?
Premiere Pro's Program Monitor shows a clean frame with no platform UI. TikTok always shows your video with its tabs, right rail, and caption block on top. Editing against a safe zone overlay shows you the zones before you export.
Do I need to hide the overlay before exporting from Premiere Pro?
Yes — otherwise it exports into your finished video. Hide the overlay track (eye icon) or delete the clip, then play the sequence back once to confirm no overlay is visible.
Are Premiere Pro's title-safe margins enough for TikTok and Reels?
No. Title-safe margins are a broadcast convention that ignores TikTok's right rail, Reels' taller header, and Shorts' subscribe button. Use them as a rough grid; the platform overlay is the real check.
Part of the ReelGuard safe zone series: TikTok Safe Zone Dimensions 2026 · Instagram Reels Safe Zone Dimensions 2026 · YouTube Shorts Safe Zone Dimensions 2026 · How to Add a Safe Zone Overlay in CapCut